- Management of Student Groups
- Managing Users
- Adding Users to Groups
- Removing Users from Groups
- Resetting User Passwords
- Adding Users in Bulk
- Downloading Group Keys
- Emailing Group Members
- Adding Additional Group Leaders
- Removing Group Leaders
- Users, Seats, and Enrolment Keys
- Adding Additional Seats to an Existing Group Subscription
- Caution: Cancelling Group Subscriptions
- Group subscription cancellation date
Management of Student Groups #
This feature is especially suitable for:
- Teachers who wish to run their own online classes such as as tuition.
- School managers who wish to run their own school on mVuli Academy.
- Sponsors who wish to sponsor and manage a group of students.
- Parents who wish to manage online studies of more than one child.
The Group Leader role is automatically assigned to anyone who purchases multiple subscriptions. At the time of purchase, you will be asked to give a unique name to your group. Keep it short and easily identifiable by your students. You will be given to a Group management page is where you as the Group Leader can manage your group without assistance from mVuliAcademy admin. The Group Management page has a lot of features to make the management of groups easy for Group Leaders.
Group Information #
When you log in and navigate to your Group Management page, the first thing you see is the group name or a drop-down list of all of the groups you are managing.

On the Group Management page, below the group heading and drop down list, you will see an indicator of seats remaining and total seats for the group you have currently selected and a list of links to the courses associated with that Group. As groups change over time (students are added, courses are added to groups, etc.) this information will be updated for quick reference.
There may be an additional checkbox to show data for child groups beneath the group heading if the selected group is a parent group and it has sub-groups. Checking this box will reload the page and populate the report with data from the selected group and all of its children sub-groups, including a combined course listing for all groups in scope and removal of the Users drop-down list and seat count (since the report spans several groups and students/users are only managed by individual group).
Group Users #
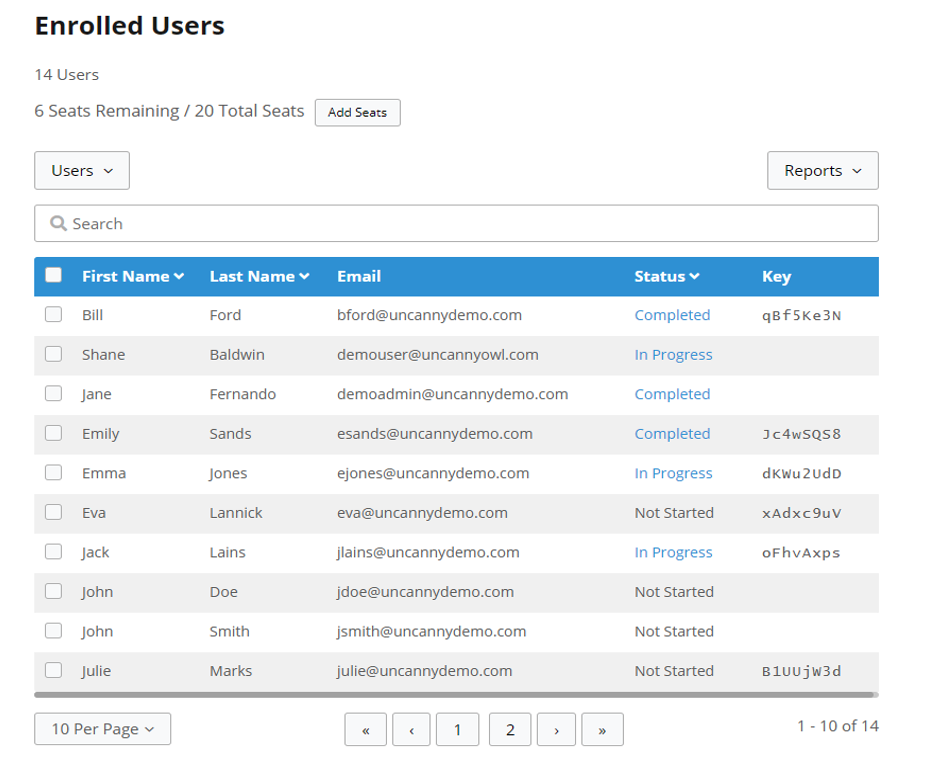
The next section of the page is the Enrolled Users list that contains two menus for the main management functions that are available to Group Leaders on the front end (see Fig. below). The Enrolled Users list is the current list of your group users, their email addresses, their status, and their enrolment key.
Group Leaders can click a student’s name to bring up the Edit User dialog to change a student’s username.
Managing Users #
Adding Users to Groups #
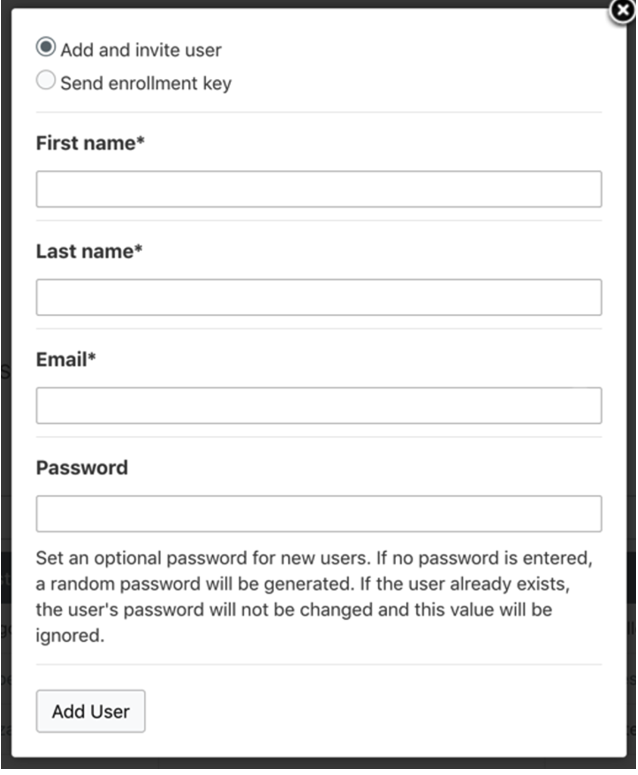
When you click the Users menu, you can choose between adding one user or adding multiple users. If you select Add one, a form appears with two options:
- Add and invite user: Enter the user’s first name, last name, and email address to add them to a group. Once you click the Add User button, an email is sent to the user. The user is added to the list of users in the group and they take up a seat in your group, and their status is set to Not Started. If you add a user that already exists on the site, the system will automatically assign a key, add them to the group and send the Add and invite (existing user) They then occupy a seat in the group just like a new user.
- Send enrolment key: Enter the user’s first name, last name, and email address to send them the Send enrolment key email. Once that user registers and redeems that key, they take up a seat in the group, are enrolled in the group and can begin group courses.
Setting a password here does allow users without a valid email address to be created. Simply use a placeholder email address and password and this account information can be provided to a student to sign in.
Removing Users from Groups #
To remove users from a group, select the users you would like to remove from the Enrolled User list, and a Remove User(s) button will appear. Click on the Remove User(s) button. You will be prompted to confirm your action.
You are only be able to remove group members before they have enrolled and begun their courses. Once a learner has begun completing the courses that are available in the group, or if they have completed all of the courses and their status is set to Completed, it may no longer be possible to remove them from the group.
Resetting User Passwords #
To generate password reset emails for users that may have forgotten their passwords, select the user(s) from the list, and a Send password reset button will appear. Click Send password reset and the user will be emailed a link to reset their password.
Adding Users in Bulk #
Users can be added in bulk by clicking Users > Add multiple, or by clicking Users > Upload Users and uploading a CSV file.
The Upload Users form has options similar to those described above, with one major difference. When uploading a CSV file, you can choose not send an email to the list of users you are uploading. You might want to do this if you plan to distribute enrolment keys to your users some other way.
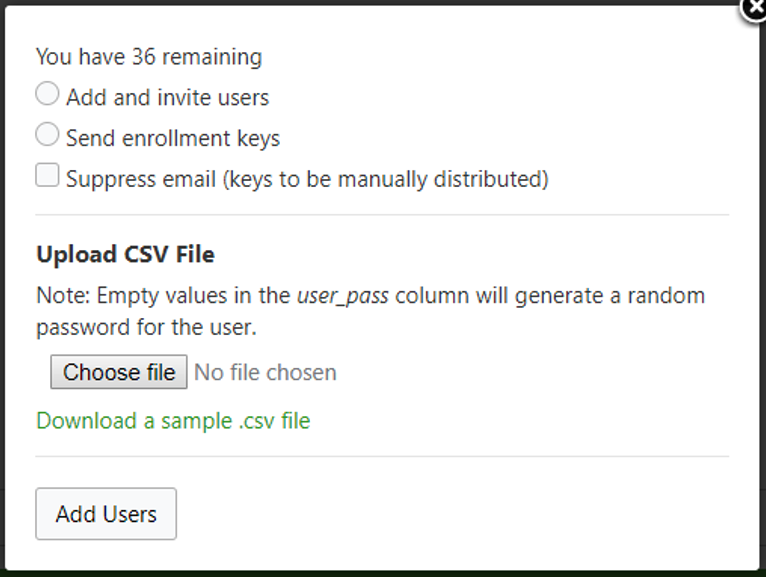
For the bulk upload to work properly, a CSV file formatted with the following column order and headings must be used: user_email; user_pass; first_name; last_name. CSV files that have incorrect formatting of email addresses, column names, etc will not be uploaded. You can download a sample file here: group_management_user_upload. If the user_pass cells are blank, a random password will be used, but the column heading should still be included. A column for “username” can optionally be included as the first column but is not required; if it exists but is left blank, username will default to the email address.
If you click Users > Add multiple, the Bulk Add & Invite Users form appears.
Users added to this form will receive an email. The users are added to the list of users in the group and they take up a seat in your group, and their status is set to Not Started.

Downloading Group Keys #
Group leaders can use enrolment keys to allocate seats and invite students to join their group.To download a full list of enrolment keys to be used for manual tracking, reporting, and distribution, simply click Users > Download Keys (see Fig. above) and you will begin downloading a CSV file. This list is the current list of unassigned keys for that group. This list is updated when the number of seats is initially set for the group and when additional users and seats are added or removed from the Group.
Emailing Group Members #
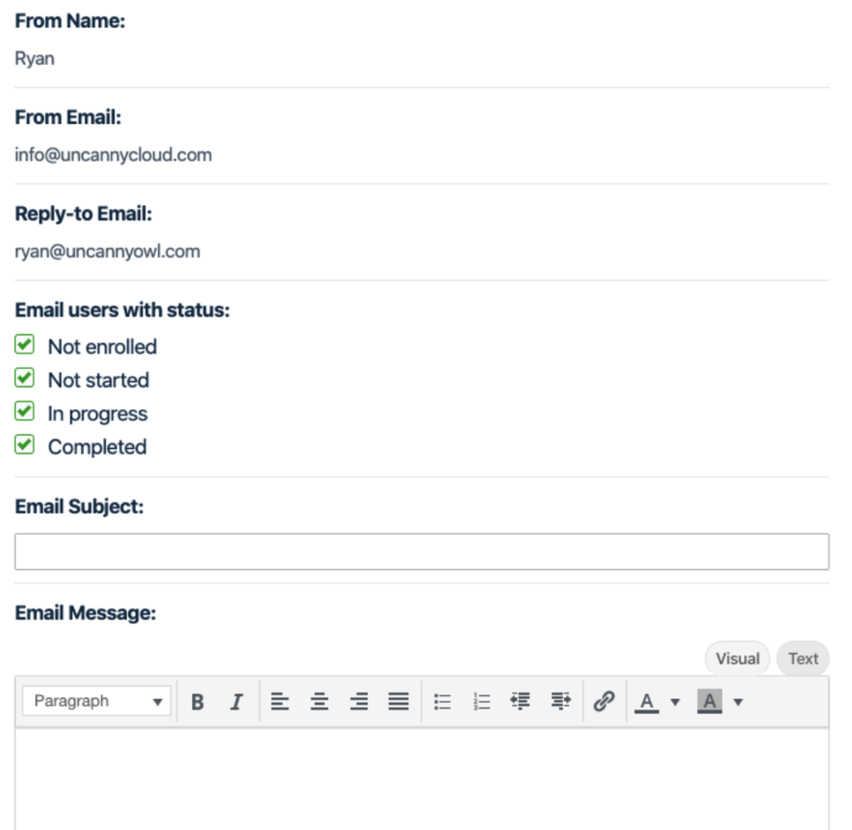
Group Leader can easily email all members of their group based on their course status (Not enrolled, Not started, In progress and/or Completed). Clicking Users > Email Users brings up the email group members interface.
Emails sent via this interface use the Group Leader’s name as the From Name, the Group Leader’s email address as the Reply-to Email, and the From Email address of mVuli Academy. Members are sent the email via BCC, so group members will not see each others’ email addresses.
Adding Additional Group Leaders #
The lower section of the Group Management page is your Group Leaders list, and this list also has buttons located above it for adding, or sometimes removing, Group Leaders. Similar to the Enrolled Users list, the Group Leaders list displays the current Group Leaders by first name, last name, and email (see Fig. below).

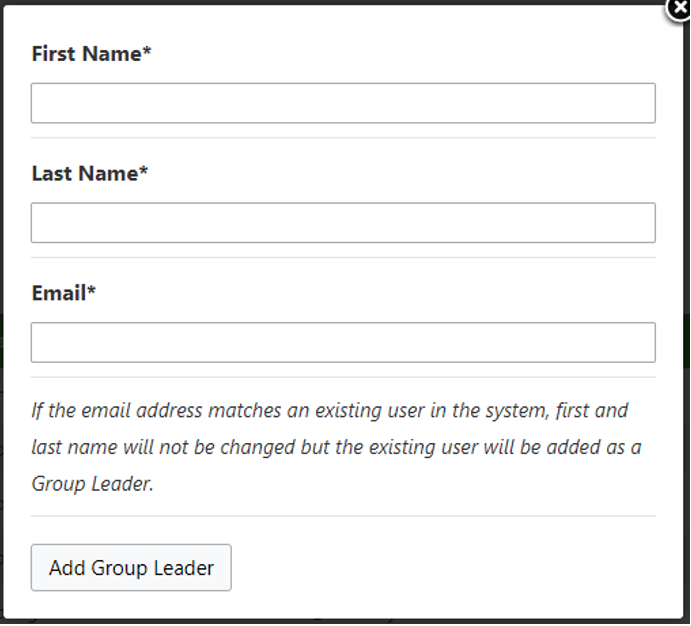
Adding more Group Leaders to your Group is even easier than adding users. Click the Add Group Leader button. Fill out the first name, last name, and email address of the person you would like to add. If you enter the email address of an existing user, the form will not alter the First Name and Last Name fields of that user, but will add them as a Group Leader, and send them a welcome email. If the user you added as Group Leader is new, they will be sent an email welcoming them to the site and the Group.
Removing Group Leaders #
To remove a Group Leader, select the users you would like to remove from the Group Leaders list, and a Remove Group Leaders(s) button will appear. Click on the Remove Group Leaders(s) button. You will be prompted to confirm your action.
Group Leaders cannot remove themselves from the Group Leaders list. This must be done by another Group Leader.
Users, Seats, and Enrolment Keys #
In order to track and manage your groups, as a Group Leader, it is important to consider the various ways that the status of a user, group seats, and enrolment keys change as users and Group Leaders are added and removed, and relative to the progress of users through group courses.
When groups are created, it generates an enrolment key for each seat that is set for a group. In addition to that, each enrolment key that gets assigned or newly generated by adding seats, is a unique, one-time key. Whenever a new user or a new Group Leader is added to a group by sending them an enrolment key, they are expected to trigger their enrolment by redeeming the key. Once they do this, their status is changed from not enrolled to Not Started. Once they begin a course, their status is changed to In Progress.
In every case, when users or Group Leaders are added to groups, with or without using an enrolment key a seat and key are automatically taken for each user and that seat remains occupied regardless of their enrolment and course completion status.
For example, if you are a teacher and your School Manager creates a group with 15 seats and assigns you as a Group Leader, you are assigned an enrolment code in the background and you occupy 1 seat in that group. When you log in and look at your group via the Group Management Page, you will see that the remaining seats in your Group are now 14. As an existing user, you will already be enrolled and have secured a seat in the Group and your status will be set to Not Started.
Please take a close look at the following table that outlines user status and the status of enrolment keys.
| GROUP MEMBER STATUS | DESCRIPTION | REDEMPTION KEY STATUS |
| Not Enrolled | An enrolment code was sent to the specified email address. | Available |
| Not Started | The user has enrolled but not yet started any courses | Available |
| In Progress | The user has started at least one of the group’s courses | Used |
| Completed | The user has completed all courses assigned to the group | Used |
Adding Additional Seats to an Existing Group Subscription #
All mVuli Academy courses are annual subscription based. Clicking Add Seats will take the Group Leader back to the shopping cart to increase the number of seats in the group. When the order is completed, the additional seats are added to the group.
Please note that seats cannot be removed from a group by a Group Leader and individual seats cannot be refunded.
Completing an order with additional seats for an existing group will create a new subscription in addition to the existing subscription.
Caution: Cancelling Group Subscriptions #
It is important to note that if 1 subscription associated with a group is cancelled, all subscriptions for that group are cancelled because there is no safe way to keep some seats active and not others. Group Leaders are warned about this at the time of cancellation.
To explain further, suppose a group with 20 students and 20 seats has a subscription for 4 seats cancelled. Now which 4 students would lose their seats? There’s no way to address this that would be intuitive to Group Leaders. So we cancel all subscriptions for the group. Similarly, when a subscription is reactivated for a group, we create a new, single subscription for the group that matches the number of seats required for the group.
Group subscription cancellation date #
Group subscription cancellation date is deferred until a subscription becomes cancelled, not just when it is pending cancellation. What this means is that users who cancel a subscription don’t immediately lose the access they paid for; instead the group access is only removed on the subscription end date.


